Reverse proxy (X-Forwarded-For) patches for WordPress comments and Bad Behaviour
By admin | October 30, 2010
Update: Reverse proxy support is now built into Bad Behaviour as of 2.1.x. Therefore the following patch is obsolete and should only be applied to Bad Behaviour 2.0.x. You can configure the built-in reverse proxy either through your settings.ini or in WordPress administration.
Normally, when PHP scripts access the remote IP of a client through REMOTE_ADDR, it can only access the IP of the last client. Under most web hosting conditions this is perfectly normal, but in some corporate networks there is a reverse name-based proxy used to serve multiple servers through one IP. However, this messes up many scripts because to them it appears that all traffic is coming through one Intranet address, and this also messes up many spam protection filters because it appears to be an internal address.
Most proxy servers send the X-Forwarded-For header when contains the real IP that it is forwarding, but this cannot always be trusted, especially if your server is open both inside and outside the intranet. This means that when getting the real IP address, one must be careful that the request is coming from a trusted proxy server and not from a rouge spammer.
Since most scripts are not programmed by default to provide this kind of functionality, we have written a patch for WordPress 2.9 and Bad Behvaiour 2.0.38. However, this is not an efficient or elegant way to perform this kind of functionality, and instead recommend that Apache (or whatever your web server is) automatically rewrite REMOTE_ADDR instead. This way no unofficial patching is required, and it is compatible with more scripts.
For WordPress 2.9:
Open <blog path>/wp-includes/comment.php and scroll to line 1199 (line 1390 in 3.5), which reads “$commentdata[‘comment_author_IP’] = preg_replace( ‘/[^0-9a-fA-F:., ]/’, ”,$_SERVER[‘REMOTE_ADDR’] );“.
Now add the following code to it (replacing 111.222.233.144 with your trusted proxy server IP):
/** Begin X-Forwarded-For Patch **/
$headers = getallheaders();
if(isset($headers["X-Forwarded-For"])) {
	// forwarded proxy
	if($_SERVER['REMOTE_ADDR'] == "111.222.233.144") {
		// this is a trusted gateway
		$xff = $headers["X-Forwarded-For"];
		$xff_array = explode(",",$xff);
		$last_forwarded_host = trim($xff_array[count($xff_array)-1]);
		// remove port number, if needed
		if(strpos($last_forwarded_host,":") !== false) {
			$lfh_array = explode(":",$last_forwarded_host);
			unset($lfh_array[count($lfh_array)-1]);
			$last_forwarded_host = implode(":",$lfh_array);
		}
		// set real client IP as IP
		$commentdata['comment_author_IP'] = $last_forwarded_host;
	}
}
/** End X-Forwarded For Patch **/
Now comments should be attributed to their source IPs in the Comment administration panel.
Obsolete for modern versions of Bad Behaviour! For Bad Behaviour 2.0.38:
Open <bad behaviour path>/bad-behavior/core.inc.php to line 116 ($ip = $_SERVER[‘REMOTE_ADDR’]).
Now add the following lines after a newline (replace 111.222.233.144 with your gateway IP):
/** Begin X-Forwarded-For Patch **/
if(isset($headers["X-Forwarded-For"])) {
	// forwarded proxy
	if($ip == "111.222.233.144") {
		// this is a trusted gateway
		$xff = $headers["X-Forwarded-For"];
		$xff_array = explode(",",$xff);
		$last_forwarded_host = trim($xff_array[count($xff_array)-1]);
		// remove port number, if needed
		if(strpos($last_forwarded_host,":") !== false) {
			$lfh_array = explode(":",$last_forwarded_host);
			unset($lfh_array[count($lfh_array)-1]);
			$last_forwarded_host = implode(":",$lfh_array);
		}
		// set real client IP as IP
		$ip = $last_forwarded_host;
		unset($headers["X-Forwarded-For"]);
		unset($headers_mixed["X-Forwarded-For"]);
	}
}
/** End X-Forwarded For Patch **/
Now Bad Behaviour will start functioning again, as by default any Intranet address is whitelisted by default.
Topics: Internet, PHP | 10 Comments »
Connecting to a network Samba PDF converter
By admin | September 30, 2010
The Samba team does not supply any existing PDF drivers for connecting Windows machines to networked PDF converters such as cups-pdf. As a result, the technique to print to the PDF “printer” involves using the drivers for the built-in Windows HP LaserJet. Here is a step-by-step method to print to PDF from your Windows computer.
Prerequisites
A set-up, ready to connect networked virtual PDF converter. This article will only cover connecting, not setting it up.
Procedure
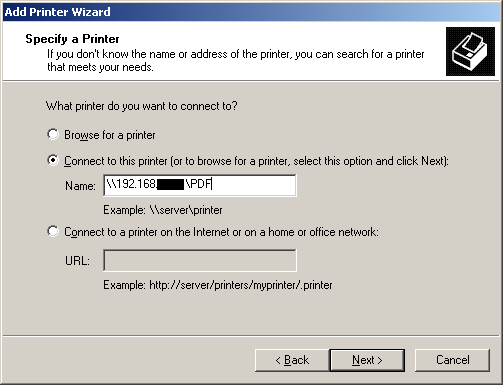
- Open the “Add Printer” dialogue in Windows. Specify Network printer when asked.
- Fill out the path to your networked PDF printer as follows: \\<hostname>\<Printer name>

- Click “Yes” and “OK” for the next two warning from Windows.

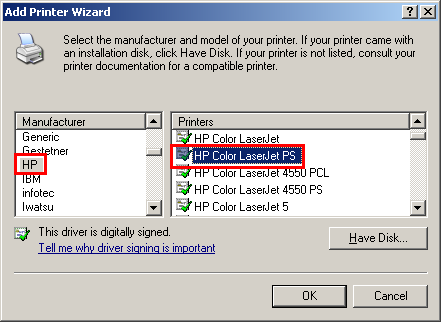
- Select the HP LaserJet printer driver as shown as follows:

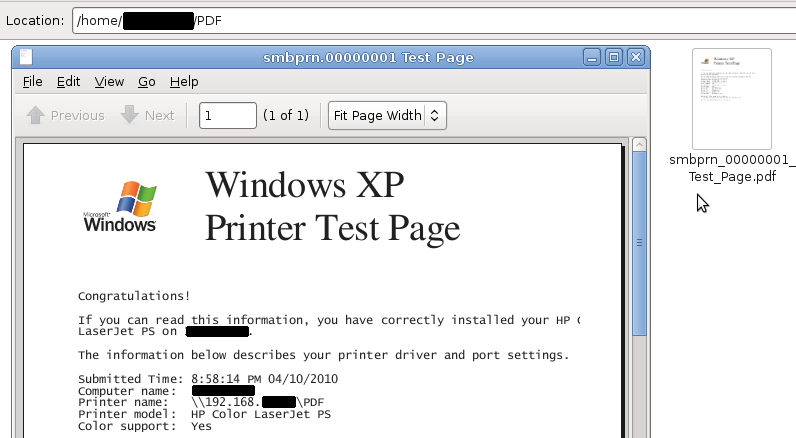
- After the driver installs, set it as your default printer in Windows or not and print a page to it. You can find the results in your cups-pdf output folder (usually /home/<username>/PDF and /var/spool/cups-pdf/ANONYMOUS for anonymous jobs)
Topics: Linux, Windows | 12 Comments »
Solving the infinite GRUB loop (GRUB GRUB GRUB GRUB GRUB) problem
By admin | August 30, 2010
Sometimes, especially after changes to the hard drive or changes to partitioning, you will find that your Linux computer would no longer boot, but instead fill the screen up with GRUB GRUB GRUB GRUB GRUB GRUB GRUB GRUB GRUB, etc infinitely without giving the boot menu, and the only way to exit out would have been to press Ctrl-Alt-Delete and reset the machine.
Apparently the problem is caused when GRUB tries to load the next stage of the bootloader, but fails to load it and instead hangs in an infinite loop because it can’t read out of the next stage. However in our case the BIOS settings were perfectly fine and there was nothing wrong with that. It turns out that the actual problem lying below the infinite loop was that the GRUB bootloader was corrupted and had to be reinstalled.
Prerequisites
- Floppy drive & real 3.5 inch floppy
- Download the grub boot floppy (1.44 MB)
- Write the floppy image to a real floppy, if you are on Linux you can simply dd if=bootgrub.img of=/dev/fd0 whereas if you are on windows you can use something like rawrite to write out the image.
Steps
- Boot your computer from floppy.
- Once the floppy has fully loaded with the menu, press “c” on your keyboard to enter the command prompt.
- Type in the following commands:
find /boot/grub/stage1
Skip the (fd0) entry that it produces and note down the one that matches your /boot partition. If it does not find it, then note down your /boot partition in the form of (hdx,y) where x is the hard disk number and y is the partition number. For example, (hd0,0) is equivalent to /dev/sda1 in Linux.
- Type in the following:
root (hd<strong>x</strong>, <strong>y</strong>)
where thew (hdx,y) is the location of /boot (from above command).
- Set up grub and reboot:
setup (hd0)
reboot
If you wish to install grub to different drive, you can do so by changing hd0 to hd + your hd number.
- Remove floppy.
Errors
If you receive “Read Error” while starting the floppy you should double check your floppy and floppy drive for errors.
Topics: Linux | 13 Comments »
Setting up a HTTP Gateway on Ubuntu 10.04
By admin | August 11, 2010
An HTTP gateway is one of the ways that one can host multiple sites using only one external IP. The way that it works is that the user requests the page from the gateway and specifies which host was requested. The gateway server then forwards the request to the appropriate web server, which then returns the result to the gateway server, and the gateway server returns the result transparently to the user. This is a much better way to do multiple domains without having to purchase additional static IP address for the purpose of hosting websites.
Prerequisites
Install packages apache2, libapache2-mod-proxy-html:
sudo apt-get install apache2 libapache2-mod-proxy-html
Process
- Enable the the Apache mod_proxy as it is not enabled by default:
sudo a2enmod proxy_http
- Add a reverse proxy pass to the configuration. Open /etc/apache2/sites-available/default with your favourite text editor and add the following text:
<VirtualHost *:80>
    <Proxy *>
     Order Deny,Allow
     Allow from all
    </Proxy>

 ServerName fooserver.example.com

 ProxyRequests Off
 ProxyPass / http://192.168.42.3/
 ProxyPassReverse / http://192.168.42.3/
</VirtualHost>
Replace fooserver.example.com with your own domain name, and replace 192.168.42.3 with the internal IP address of your server (keep the http:// portion).
- Restart Apache 2:
sudo /etc/init.d/apache2 restart
- Using your hosting provider’s DNS tool, point your domain name (fooserver.example.com) to your public IP.
- You’re done! To test, visit your domain name and it should bring you the website on your internal server.
Topics: Internet, Linux | 15 Comments »
Setting up a Subversion server using Apache on Ubuntu
By admin | August 9, 2010
Subversion is an excellent open-source solution for keeping track of the different versions while developing software. Here, we will see how to set up a subversion server on an Ubuntu 10.04 LTS Server to provide programmers with the ability to use Subversion.
Prerequisities
Apache 2 should have already been installed and configured with SSL – if not, see the Ubuntu Server Guide for more details. Install the packages subversion and libapache2-svn:
sudo apt-get install subversion libapache2-svn
Setting up
- Create a home for the Subversion files:
sudo mkdir -p /var/svn
- Open up /etc/apache2/mods-available/dav_svn.conf in your favourite text editor of choice, and add the following text at the bottom (ignore anything already there):
<Location /svn> DAV svn SVNParentPath /var/svn SVNListParentPath On AuthType Basic AuthName "Subversion Repository" AuthUserFile /etc/subversion/passwd <LimitExcept GET PROPFIND OPTIONS REPORT> Require valid-user </LimitExcept> </Location> - Add a user to the Subversion – if you don’t, you may end up with strange errors like “svn: Server sent unexpected return value (500 Internal Server Error) in response to MKACTIVITY request” when trying to commit.
sudo htpasswd -c /etc/subversion/passwd admin
It will prompt for a password – just give it something.
- You’re good to go – although without any projects the server won’t have anything to commit to. Add a project to the server:
sudo mkdir -p /var/svn/project
sudo svnadmin create /var/svn/project
Results/Errors
svn commit -m nomsg test1 test2 --username=root --password=top_secret_root_password_here
svn: Commit failed (details follow):
svn: Server sent unexpected return value (500 Internal Server Error) in response
 to MKACTIVITY request for '/svn/project/!svn/act/53aca034-c64b-5b41-8bf4-
2715d91af049'
This error is because you do not have a valid login passed to the server, although it could use a much, much more descriptive message than “Internal Server Error”. Remember the login is not the Unix login, but instead the login created with htpassed.
svn commit -m nomsg test01 test02 --user
name=admin  --password=password_createdby_htpasswd_here
Adding         test01
Adding         test02

Committed revision 1.
Topics: Internet, Linux | 520 Comments »
Fixing “Error: window.location.refresh is not a function”
By admin | July 23, 2010
If when you try to refresh the page using Javascript back-end and instead of having the page refresh like you want it to refresh, instead it bounces back into your Javascript Console with a cryptic error that reads “Error: window.location.refresh is not a function“. This can be very puzzling, especially if you are not a regular JavaScript programmer, so one can look into the documentation:
object.reload( [bReloadSource])
Reloads the current page
There’s just one small problem – it’s actually object.reload, not object.refresh! Some poor quality websites (or popular websites which make mistakes) accidently specify location.refresh instead of location.reload. So instead of calling location.refresh(), one should call the following to refresh the page:
window.location.reload();
Topics: (X)HTML | 12 Comments »
Updated Roadsend PHP Compiler 2.9.8 packages
By admin | July 21, 2010
Due to the vast interest in our previous binary package of Roadsend PHP, we have decided to compile a newer, updated version of the Roadsend PHP compiler (v2.9.8). However, due to previous flaws in the way that we compiled the previous PHP compile, many of our readers struggled or were entirely unable to get the compiler installed. As a result, Compdigitec is compiling new, fresh packages to target Ubuntu 9.10 and will make it easier to run Roadsend PHP on your Ubuntu Linux computer.
Prerequisites
- Uninstall any old versions of Roadsend PHP and bigloo on your computer.
- Install the packages libgtk2.0-0, libpcre3, libfcgi, libmysqlclient15off and libsqlite3-0 like such:
sudo apt-get install libgtk2.0-0 libpcre3 libfcgi libmysqlclient15off libsqlite3-0
- Install unofficial bigloo and set up the bigloo symlink like such:
sudo ln -s / /z
Procedure
- Download and install the Roadsend PHP binary package:
- roadsend-php-unofficial.deb (4.8 MB)
Note that the Roadsend PHP debugger (pdb) has been renamed to (roadsend-pdb) due to naming conflict with python.
- Create a test PHP file with the following content, and save it as hello.php:
<?php // Roadsend PHP testing program $words = Array("Hello", "World", "from", "Roadsend PHP!"); $sentence = implode(" ",$words); echo $sentence . "\n"; exit(0); ?> - Run:
pcc hello.php
to generate a hello executable. Test this executable by running:
./hello
The output of the program should read:
Hello World from Roadsend PHP!
- Now we will test the MicroServer backend, which is a small embedded webserver that allows you to turn your PHP application into a stand-alone webserver:
pcc -s hello-server --port 44444 hello.php
to generate the hello-server webserver. Now, we will try to visit the MicroServer:
./hello-server
The server should be up and running by this point. Now point your browser at http://127.0.0.1:44444/hello.php and watch your PHP turn itself into a webserver without Apache.
Topics: Linux, PHP | 6 Comments »
ASP.NET GridView All-In-One Quick Reference
By admin | July 17, 2010
Here is a quick collection of snippets where one can quickly lookup the necessities of setting up a GridView for the purposes of displaying information to the viewer through a database (for example, MySQL):
Adding Columns of Data
DataTable dt = new DataTable("Tablename");
dt.Columns.Add("Column1");
dt.Columns.Add("Column2");
dt.Columns.Add("Column3");
// for every row
DataRow dr = dt.NewRow();
dr["Column1"] = "Testing";
dr["Column2"] = "Blah";
dr["Column3"] = "Big Blah";
dt.Rows.Add(dr);
Binding the Data (and storage across sessions)
DataView dv = new DataView(dt);
Session["data"] = dv;
gridviewctrl.DataSource = dv;
gridviewctrl.DataBind();
Paging
Note: This needs AllowPaging to be set to “true”. The following code goes in the “PageIndexChanging” callback.
gridviewctrl.PageIndex = e.NewPageIndex;
gridviewctrl.DataSource = Session["data"];
gridviewctrl.DataBind();
Sorting
Note: This needs AllowSorting to be set to “true” and ensure all columns you want sorted have a “SortExpression” that matches the column name in the DataTable. The following code goes in the “Sorting” callback.
string dir;
if (e.SortDirection == SortDirection.Ascending) {
    dir = "ASC";
} else {
    dir = "DESC";
}
((DataView)Session["Data"]).Sort = e.SortExpression + " " + dir;
gridviewctrl.DataSource = Session["data"];
gridviewctrl.DataBind();
<asp:ButtonField>s
Create a <asp:ButtonField> declaration as follows: <asp:ButtonField ButtonType=”Button” Text=”Button Text Here” CommandName=”DoSomething” />
if (e.CommandName == "DoSomething") {
    // get Index
    int index = Convert.ToInt32(e.CommandArgument);
    string test = ((DataView)Session["Data"]).Table.Rows[index]["Column1"];
    Response.Redirect("http://www.google.com/search?q=" + test.ToString()");
}
Topics: Internet, Windows | 11 Comments »
Solving Could not find stored procedure dbo.aspnet_CheckSchemaVersion in ASP.NET Membership
By admin | July 13, 2010
Normally, as usual, one would not see the error Could not find stored procedure ‘dbo.aspnet_CheckSchemaVersion’ if one has a good database already setup with everything good to go. However, sometime the annoying error Could not find stored procedure ‘dbo.aspnet_CheckSchemaVersion’ crops up one can check the steps below to determine the root cause of the error:
- Try to recreate the Memberships database (ASPNETDB) – it may be corrupt or inaccessible:
C:\Windows\Microsoft.NET\Framework\v4.0.30319\aspnet_regsql -S . -E -A mrpc
- If that does not resolve the problem for you, the you should check in your web.config file to see if added “Initial Catalog=aspnetdb” somewhere in your web.config file like this:
Data source=.;Integrated Security=True;Initial Catalog=aspnetdb
- Restart IIS.
Topics: Windows | 19 Comments »
Solving Handler “PageHandlerFactory-Integrated” has a bad module “ManagedPipelineHandler” in ASP.NET 4.0
By admin | July 12, 2010
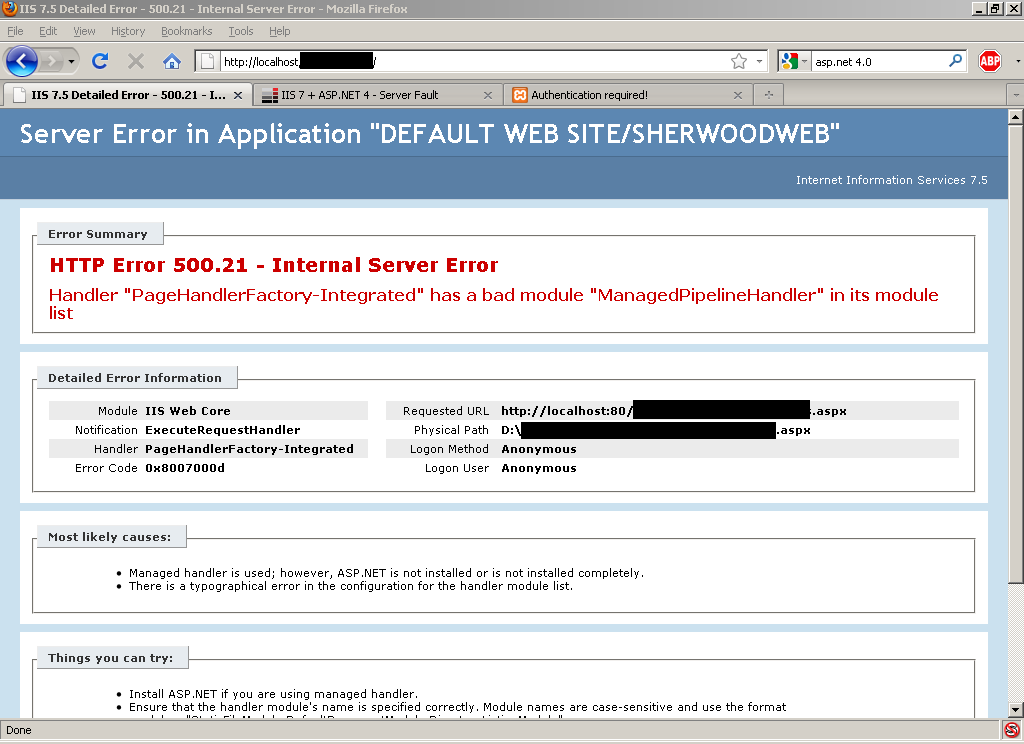
 If you have just installed Visual Studio 2010 or the .NET 4.0 Framework and trying to host ASP.Net 4.0 applications doesn’t work for you and results in the following error message:
Handler “PageHandlerFactory-Integrated” has a bad module “ManagedPipelineHandler”
It means that you haven not yet run the aspnet_iisreg.exe executable needed to register the ASP.NET 4 framework with the IIS 7 webserver. In order to do so, open a command prompt and type in the following:
C:\windows\Microsoft.NET\Framework\v4.0.30319\aspnet_regiis.exe -i
Substitute v4.0.30319 for what other past or future ASP.NET versions. To uninstall the ASP.NET 4 (e.g. for when you are done playing around with it and would like to do some work):
c:\windows\Microsoft.NET\Framework\v4.0.30319\aspnet_regiis.exe -u
Topics: Windows | 27 Comments »

